Welcome

This website is the byproduct of my continuing experiment with hypertext. It's ultimate aim is to be the online equivalent of a crumpled up notebook. Make of it what you will.

Random quote1:

A physicist, an engineer, and a computer scientist were discussing
the nature of God. "Surely a Physicist," said the physicist,
"because early in the Creation, God made Light; and you know,
Maxwell's equations, the dual nature of electromagnetic waves, the
relativistic consequences..." "An Engineer!," said the engineer,
"because before making Light, God split the Chaos into Land and
Water; it takes a hell of an engineer to handle that big amount of
mud, and orderly separation of solids from liquids..." The computer
scientist shouted: "And the Chaos, where do you think it was coming
from, hmm?"

- Anonymous

Categories:

FlexCPPBridge(1) Flex(27) AIR(9) FrndNet(2) SQL(1) CGI(1) SSH(1) Java(1) Win32(1) Latex(2) Emacs(6) Javascript(2) Notes(3) Gnus(1) CSS(2) Rant(5) C++(2) Linux(6) EmacsWiki(4) Web(4) C(5) Programming(11) General(6)

Latest entries:

  1. December 10:Flex 4 Wizard Component with Progress Indication and Move Effects
  2. December 09:Flex 4 Component: Navbar with Scoped Search, Vimeo Style
  3. November 25:Black Glass - Flex 4 Theme
  4. November 04:Developing a Google Reader Client in Adobe AIR
  5. October 30:Google Reader Readefined Plus Readefine Desktop
  6. October 13:Building a CRUD application using Clojure and Flash Builder 4
  7. October 12:Building a CRUD application using Java 6 Web Services and Flash Builder 4
  8. October 07:Accessing a Coldfusion Data Source from Flash Builder 4 without writing Code
  9. September 01:Beautiful Reading via Flex 4
  10. August 10:Flex 4 Component - Slanted Button Bar

Total Posts: 103

anirudhs.chaosnet2.org uses valid XHTML3, valid CSS and valid RSS.


[1] Chosen at publish time from QuotePage.
[2] CHAOSnet is a networking protocol for LISPMs, ITS and others.
[3] Though the pages are served as text/html.

Notes

Flex 4 Wizard Component with Progress Indication and Move Effects

December 10, 2009 6:08 PM
I love the Insuricorp demo. The wizard in that has two distinguishing features. A subtle animated progress indication that not only denotes the current step, but also the fact that you are progressing. And the other thing - a neat move effect between each step so that it looks like the next step is sliding in from the right. I built a Flex 4 component that does exactly this. Use it similar to our good old Flex 3 view stack and voila!

Wizard Component

Only a demo (view source enabled) can do it justice. Click the image below to try it out:

Flex 4 Wizard Component

You can also download the FXP. The source is licensed under MPL 1.1.

Try clicking next and previous pretty fast. The move effects play in parallel so that there is a kinetic feel to it.

Usage

First, declare the step names:

[Bindable] 
private var wizardViews:ArrayCollection = new ArrayCollection(
 [new WizardStepVO({name:"PICK PLAYLIST", state: "selected"}), 
 new WizardStepVO({name: "SOURCE", state: "normal"}), 
 new WizardStepVO({name: "DESTINATION", state: "normal"})
 ]);

Now declare the view elements of the wizard as a child to the WizardPanel tag:

<wizard:WizardPanel id="wizard"    
     change="trace('step: ' + wizard.currentStepTitle)"
     wizardViews="{wizardViews}">
  <steps:PickPlaylist width="100%" top="40" bottom="30" />
  <steps:PickSource width="100%" top="40" bottom="30" />
  <steps:PickDestination width="100%" top="40" bottom="30" />
  <steps:Finish width="100%" top="40" bottom="34"  />
</wizard:WizardPanel>

The only difference from a view stack is that since GraphicElements do not have a "label" property, you have to provide the step name via a wizardViews property. Internally, the children passed to the component gets added to a Group and its visibility is toggled based on the current step.

Effects

Pressing "Next" causes the next step to slide in and the current step to slide out. Then the progress indicator grows to cover the new step while the color of the indicator changes from white to blue. I used the new Flex 4 AnimateColor effect for this.

The move effects work in parallel so that multiple next / previous does not cause abrupt changes.

Conclusion

This was my first Flex 4 component. I had forgotten about it till I was cleaning up my Eclipse workspace. Let me know if you guys find it useful.

CategoryFlex Comment(s)


Flex 4 Component: Navbar with Scoped Search, Vimeo Style

December 9, 2009 11:29 PM
I came across this great post by Theresa Neil: 30 essential controls for RIA design. I liked control twenty-three in particular: Scoped Search. So I cooked up a Flex 4 navigation bar (vimeo style) that has scoped search and is completely data-driven and customizable via CSS. It does not use any images; everything is drawn. Along the way, I built some potentially re-usable things like a dotted line graphic element and a vertical separator layout.
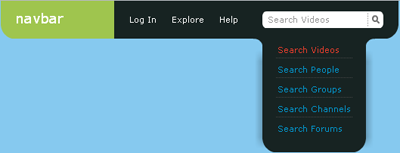
Inspiration

Vimeo.com is beautifully designed. I noticed the beautiful top navigation header only when it was referenced from Theresa's article. The blended curves are beautiful. It is the "Scoped Search" part that drove me to build this component.

What is Scoped Search?

Flex 4 Scoped Search

According to Theresa:

Scoped search like ITunes, allows for the optional selection
of a category before entering free form search text...
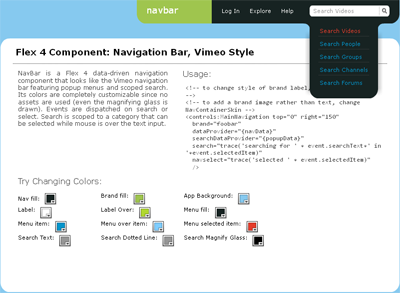
Demo

Click the image below to run the demo (view source enabled, the source is under MPL 1.1):

Flex 4 Navbar with Scoped Search Vimeo Style

You can also download the FXP.

The demo lets you change any color at runtime. These colors are passed in via CSS. In a real use-case, you could also change the data displayed at runtime.

On mouseover over a top level item, a popup menu is displayed. This menu stays open in the case of scoped search to allow changing the selected item in the list while displaying a changing prompt text if the user has not entered anything.

Events dispatched are shown in the bottom.

Using Navbar

To get started, declare the data to be set:

[Bindable]
private var navData:ArrayList = new ArrayList(
[{label: "Log In"}, {label: "Explore", menu: explorePopup},
{label: "Help", menu: popupData2}]);

private var explorePopup:ArrayList = new ArrayList(
    ["Categories", "Groups", "Channels",
     "Toys"]);

[Bindable]
private var searchCategories:ArrayList = new ArrayList(
    ["Search Videos", "Search People", "Search Channels",
     "Search Forums"]);

Assign them via the dataProvider and searchDataProvider attributes:

<!-- to change style of brand label, see scopednav.css -->
<!-- to add a brand image rather than text, change NavContainerSkin -->
<controls:MainNavigation top="0" right="150" 							 
  brand="foobar"
  dataProvider="{navData}"
  searchDataProvider="{searchCategories}"
  search="trace('searching for ' + event.searchText+' in '+event.selectedItem)"
  navselect="trace('selected ' + event.selectedItem)"
  />

The search event is fired when a scoped search is performed (by clicking on the magnifying glass or pressing enter). navselect is fired when a menu item is clicked.

Components that come along with Navbar

1) There is a new GraphicElement, DottedLine, which you can use in Flex 4 the same way as Line, Rect, etc. DottedLine uses a bitmap fill to draw the dots (thanks to warm forest).

2) VerticalSeparatorLayout: If you notice the List in the popup menu, the separator (dotted line) is not drawn for the last element. This is done via a custom layout1 that makes the separator of the last item in the List invisible.

3) ScopedDropDown: This is used to popup the menu (List). It is a customized DropDownList which can stay open till it is notified that it can be closed.

4) Magnifying Glass: Not exactly a component, but an ellipse and a line that looks a lot like a search magnifying glass2.

Flex 4 Observations

Some points3 I noted while developing the component:

Rect

The Rect primitive can support setting a corner radius X, Y property on an individual corner via: bottomLeftRadiusX, bottomRightRadiusX, topLeftRadiusX, topLeftRadiusY, etc.

That said, for the blended look in the popup list, I had to cheat and draw two rectangles: one normal and another filled with background color and set with corner radius. Maybe there is a blend mode that can erase whatever is underneath it of a particular color?

CSS

In CSS, you use namespace|component. This is expanded to the fully qualified name of the component. This is important to know if you want to modify a style declaration at runtime (like in the demo). For example, if you wanted to change navFill defined in the CSS declaration container|NavContainer:

StyleManager.getStyleDeclaration('net.anirudh.container.NavContainer').
    setStyle('navFill', navfill.selectedColor);

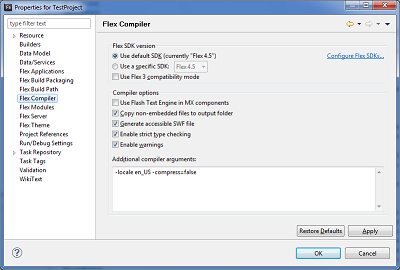
The syntax in Flex 4 for CSS is incredibly powerful. For example, this is how the brand label is changed via CSS:

/* In NavContainer change Label with id brandLabel */
container|NavContainer s|Label#brandLabel
{
  fontSize: 18;
}

Skin

Any style defined for the component is available in the skin. GraphicElement's don't support CSS, so you could bind properties via getStyle() calls.

Override updateDisplayList() if you want to check a CSS property and do something like make a Rect invisible in the skin.

GraphicElement

When you are building your own GraphicElement, you can access the Graphics object via:

//The base GraphicElement class has cleared the graphics for us. 
(drawnDisplayObject as Sprite).graphics

Conclusion

Developing with Flex 4 is sweet, sweet bliss. In my opinion, this is the most well architected GUI framework out there.

CategoryFlex Comment(s)


[1] I'm certain this was never considered as a reason why people would customize a layout. Nevertheless, it works beautifully with minimal code.
[2] Yes, I know should have used an icon. But I wanted to be able to change its color.
[3] Please do not consider any of these as hard and stead-fast rules. These are simply my own observations.


Black Glass - Flex 4 Theme

November 25, 2009 5:56 PM
I took a leap of faith. I tried it out. I built a black Flex 4 theme using Flash Catalyst alone. Last week, I watched Harish build a Flex 4 theme using Catalyst. Leaning over his shoulder, I gaped on while he effortlessly moved rectangles and ellipses around to build a dialog window that looks fantastically close to the "Display Properties" dialog on the Mac. I was so impressed (anyone who has watched Harish demo Catalyst will be) that I took a leap of faith. Read on for the details and some Catalyst tips.

Black Glass

Black Glass Flex 4 Theme

Click here to try it out.

You can download the code (FXP) here. This was tested with Flash Builder 4 Beta 2 using the Flex 4 Beta 2 SDK.

Design

First a disclaimer: I'm not a designer or a UI expert; feel free to bash me for my poor choice of colors. Doomed it may be, but I will build an app using this theme.

I've always wanted some Flex theme to have that blue color along with black. My fetish for the blue and black is evident in Deskworld:

Deskworld Desktop

I started working on the theme with only a simple concept, inspired by the highlight part of a Button skin in Flex 4:

A line with 0xcccccc color, 0.25 alpha at the top that leaves some gap on both sides, another line below it with the same color but 0.07 alpha extending fully along the side. Similar setup below, but visible only on mouse over. There's also two blue lines on the left and right with 0.07 alpha. The bottom two lines turn blue on mouse down.

Flash Catalyst Tips

Amazing tool. All Flex developers should try it out to instantly see how changes to properties and styles affect components without the compile cycle in Flash Builder.

For example, a gradient stroke on an ellipse with the stop point set at around 0.36 with alpha 0 is used to draw the highlight on top of the thumb in the slider. This would have been hard to preview and tweak around with in FB's design view1.

Generated Code

There's some tweaking2 you have to do to Catalyst generated code so that the components resize properly. Basically, take note of hard-coded width or height numbers and convert them to use constraints (left, right, top, bottom). This becomes painful when you have items under a Group. So, you may want to "Ungroup" before importing the FXP in Flash Builder 4.

CSS

A practice I've found useful: Strip out the properties applied to individual components like focusColor and skinClass into a CSS file. This way, a person will be able to use your skins just by dropping in your CSS file.

For example, this is a portion of the CSS file I created for Black Glass:

s|Button
{
	focusColor: #0d103f;
	skinClass: ClassReference("components.Button2");
	fontFamily: "Inconsolata";
}

You can choose to use my theme by simply putting in a Style tag:

  <!-- apply our theme -->
  <fx:Style source="blackglass.css"/>

Conclusion

Try out Catalyst. Flex 4 rocks.

CategoryFlex Comment(s)


[1] Normally, I would have used AS3 for this.
[2] Maybe, it is a beta thing?


Developing a Google Reader Client in Adobe AIR

November 4, 2009 6:53 PM
Google Reader does not have an official API. However, Nial Kennedy and the project pyrfeed have excellent documentation on it. I had developed a Google Reader client in python that the web version of Readefine uses1. I needed to leverage the same AS3 code base and write an AS3 Google Reader client on top of it for the desktop version. I managed to do it in a day while ensuring a common code-base for the AIR and Flex versions thanks to conditional compilation. This article explains Google Reader's API along with the AS3 implementation and how it merged in with the web-version.

Interestingly, there is AS3 code for Google Reader access in snackr's code. I wrote my own though because I needed it to seamlessly merge with my existing Flex code. Regardless, this is the screen-shot of how Readefine Desktop looks with Google Reader access and all chrome minimized:

readefined

For more screen-shots, visit Readefine Desktop.

Google Reader API

Google Reader is excellently architected. Its view in HTML and Javascript is independent of the actual methods to get and update Google Reader2.

There are three main parts to the API: authentication, getting data and updating data.

Kindly read the articles referenced in the first paragraph of the article before proceeding. The information regarding the API here augments that information.

Authentication

ClientLogin is what you have to use and it is well documented by Google. You have to do an HTTP POST to a URL while setting the service as reader and passing the username and password.

Ideally, an OAuth or AuthSub implementation would help third-party applications to leverage Google Reader without having users enter their precious skynet password into their application. Let us hope Google releases that in the near future.

Getting Data

The flow for a Google Reader Client is as follows (after auth):

1) Get user info by asking /api/0/user-info.

2) Get subscription list. Each subscription contains a "category" if the user had created folders. It also has a field called firstitemmsec that denotes in milliseconds the time from which entries for that feed should be picked up.

firstitemmsec initially stumped me until I added a new subscription. I noticed that Google Reader has entries for a feed spanning back to a month (probably -infinity). So the reader has to know to show you articles only from the time you subscribed to a feed.

ot is the parameter that takes firstitemmsec / 1000 when you are fetching the reading list or a particular feed.

3) Get unread counts. The total will be with the feed id user/userid_obtained_in_step1/state/com.google/reading-list. This has an upper bound of 1000, so 1000 is always 1000+.

4) Get the reading list or a particular feed while being careful to pass in the correct ot. Each article in the feed will have special fields if it is read, starred, kept-unread, etc.

5) To get the next set of articles, pass in a "cont" GET parameter to the call in 4.

Every now and then, you have to fetch unread counts because it changes often depending upon the amount of feeds you are subscribed to.

Updating Data

Marking as read, star, like, share, etc. all fall into this category. This is slightly more tricky than getting data because it involves a token.

This is what I understood:

1) Get a token by posting to /api/0/token. Save the current timestamp.

2) Every API call that requires a token must be queued so that there is only one outstanding call at a time.

3) Before making an update API call, check your saved timestamp to see if it has been more than 20 minutes3. If it has, get a new token, then continue with the API call.

Google Reader Client in AIR

I have a ServiceLocator singleton class with methods like greaderGet(), greaderStar(), etc. In that method, depending upon a compilation variable, I either call the AIR code or my python server side code.

public function googleReaderUnreadCount():void
{
    CONFIG::FLEX
    {
        var s:HTTPService = getGReaderService();;
        var token:AsyncToken = s.send({a: 'c'});
        
        token.addResponder(new GReaderCommand(GReaderCommand.GREADER_UNREAD));
    }
    CONFIG::AIR
    {
        greaderClient.getUnreadCount();
    }
}

Since I'm using an AsyncToken, I have a GReaderCommand, a class that implements an IResponder. The command's result() method expects data to be an Object that you normally get when resultFormat is "object" in an HTTPService.

GReaderClient is the AIR class that talks to Google Reader using a URLLoader. It takes in the parameters object that was passed to HTTPService's send(). Each method knows its GReaderCommand type. It then creates a map of requests to loader (for getting the parameters) and a map of urlloaders to command.

After performing any API call to Google Reader, there is a single common result handler that marshall's the response based on how GReaderCommand expects it.

private function handleReaderResultEvent(event: Event): void 
{						
    var urlloader:URLLoader = event.target as URLLoader;
    var req:URLRequest = clearFromQueue(urlloader);
    var result:String = String(urlloader.data);
    urlloader.removeEventListener(Event.COMPLETE, handleReaderResultEvent);
    urlloader.removeEventListener(IOErrorEvent.IO_ERROR, handleReaderFaultEvent);
    if ( !req )
        return;
    var gCommand:GReaderCommand = clearCommandFromQueue(req);
    if ( gCommand )
    {
        marshallReaderResponse(gCommand, result);
    }
}

The marshallReaderResponse creates objects that GReaderCommand's result() method expects which may be object or e4x. In the case of object when the response from Reader is XML, I use an XMLDocument along with a SimpleXMLDecoder. If the response from Reader is in JSON, I parse it using JSONDecoder and build the appropriate object.

Creating an object from XML:

xmlDecoder = new SimpleXMLDecoder(true);
try
{
    xmlDoc = new XMLDocument(result);
}
catch(err:Error)
{
    xmlDoc = null;
}
if ( !xmlDoc )
    obj = xmlDecoder.decodeXML(xmlDoc);

The marshall method finally calls the command's result() method with the data.

Here is the full source for my GReaderClient.as. It is incomplete without GReaderCommand, but this you should serve you as a good starting point in developing an Adobe AIR Google Reader client.

For more information on Readefine Desktop, visit readefine.anirudhsasikumar.net.

CategoryAIR Comment(s)


[1] Since cross-domain requests are not allowed from flash player unless explicitly allowed.
[2] Except for quickadd which seems to return HTML and JSON data in the end in a script block.
[3] Time interval obtained after careless observation. Might be incorrect.


Google Reader Readefined Plus Readefine Desktop

October 30, 2009 1:07 AM
I keep up with the incessant flow of articles on the internet via Google Reader1. It has the same set of problems when it comes to reading text-heavy articles which Readefine can help out with. I'm quite happy to announce two things: Readefine can now be a quite decent Google Reader client and it also comes as a desktop application (Adobe AIR application). Readefine's popularity was unexpected and overwhelming. I want to thank all of you for your encouragement and valuable feedback.

Google Reader

You can login to Google Reader via Readefine and view articles from your reading list and also see your subscriptions to navigate by feed. Keyboard shortcuts like Space, n, v, etc. help you navigate through the river of news with "Space" key flowing across pages as well as articles.

Google Reader Readefined

Apart from this, you can star, like, keep unread and share articles. Adding subscriptions and marking all as read is also possible.

You can filter out feed names in your subscription list by typing in the "Search" box in the subscriptions panel.

Webcomic Mode

Articles from xkcd.com automatically toggle a new mode in Readefine called "Webcomic mode." It makes the article single column, maximum width so that the webcomic (image) can be viewed without distortion.

For other webcomic sites, you'll have to manually toggle "webcomic mode" by clicking on the button.

Engineering

Applying the river of news analogy to a system where the article summaries are laid out fluidly was challenging. It pages articles, marking them read as you move along, trimming old ones and concatenating new ones to the list. The list is divided horizontally and vertically with articles from the top one flowing to the left pane based on available screen size.

The web version and desktop version of Readefine work differently when it comes to Google Reader. The web version is on Google App Engine. There's a GAE python Google Reader client that actually talks to Google Reader. The desktop version has a pure AS3 Google Reader client. It is therefore faster.

Security

Since Google Reader has no support for Authsub or OAuth, Readefine requires you to enter your Google username and password. In the web version of Readefine, The username and password are shuttled via HTTPS to https://readeem.appspot.com/glogin and then onto Google's servers since crossdomain requests are not allowed from Flex unless explicitly allowed. The domain name for the login endpoint does not match readefine.anirudhsasikumar.net because Google App Engine doesn't support HTTPS for custom domains.

Note: The desktop version talks directly with Google servers. It is also faster because of the same reason.

Readefine Desktop

You can install Readefine Desktop by visiting the install page. Some unique features about the desktop version:

  • Drag and drop text, HTML, RSS files from your desktop onto Readefine.
  • You can also use it when you are disconnected from the internet to read content on your computer.
  • It is faster and does not contact Readefine servers for accessing Google Reader or the web.
  • Less startup time - since the app is installed on your computer.
  • Usually, there's more screen estate available to Readefine desktop than the web counterpart due to lack of browser chrome.

Other Changes to Readefine

  • The UI has been slightly re-designed with the left pane resizable, top header collapsible. The top header has been reduced for more real estate (especially on wide-screen computers).
  • HTML parsing has been vastly improved.
  • You can now load RSS files from your local machine.
  • Overall performance improvements.

Next Steps

To all those waiting eagerly for the components used in Readefine to be open-sourced: Sorry about the delay, but I'm going to do that next. The main problem is that the NewsText component that does the paging and sectioning does not work with Flex 4 Beta 2 SDK. I have to port it over and then the components will be released.

As always, any feedback you have is welcome.

CategoryFlex Comment(s)


[1] Mainly because desktop RSS clients miss entries unless they are left running constantly.


Building a CRUD application using Clojure and Flash Builder 4

October 13, 2009 8:23 PM
Lisp is a language that many developers shy away from. But I urge everyone to try it out at least once, because it offers the possibility of opening up doors in your mind that you know didn't exist. Clojure is a modern Lisp dialect that runs on the JVM and is designed for concurrency. In this article, I will build an end-to-end CRUD application in Clojure which connects to a mysql database and has a Flex UI as the front-end.

The complete source is available for download: clojure source file and Flex MXML file.

Clojure

Clojure compiles source into Java bytecode and can therefore leverage existing Java code while superimposing a functional programming paradigm on top of the mature, optimized Java virtual machine. Data is immutable and there are software transactional memory and agent systems to make developing parallel programs painless.

Setting up Clojure

You need clojure and compojure (a web framework). You can get them from their respective sites or do it the easy way:

1) Grab the following JARs from github repository of programming-clojure:

clojure-contrib.jar, clojure.jar, commons-*.jar,
compojure.jar, jetty-*.jar, servlet-api-*.jar

2) Get the mysql connector JAR.

3) Create a Java project in Eclipse (if you are an IDE guy), add all the above jars to the build path.

4) Create a Java class known as MainApp in your source folder (src):

public class MainApp 
{   
    public static void main(String[] args) 
    {
        try
        {
            clojure.main.main(args);
        }
        catch (Exception e)
        {
            System.err.println("Err: " + e);
        }
    }   

5) If you run the application now, you will get the Clojure REPL. Create a file called user.clj in your source folder (src) and put this in:

(use 'compojure)

(defroutes my-app
  (GET "/"
    (html [:h1 "Hello World"]))
  (ANY "*"
    (page-not-found)))

(run-server {:port 8080}
  "/*" (servlet my-app))

6) Save user.clj, re-run the application and navigate to http://localhost:8080 and you should see a hello world. Congratulations, you have clojure and compojure set up and running the embedded Jetty server.

Writing the CRUD App in Clojure

Clojure has some nice libraries that will ease development and offload common tasks such as HTML/XML parsing and generation, MySQL access, etc. We will use the sql library in clojure-contrib for our MySQL access.

Our database schema is simple:

CREATE TABLE Books
(
   BOOK_ID SMALLINT UNSIGNED NOT NULL AUTO_INCREMENT,
   BOOK_NAME VARCHAR(400) NOT NULL,
   BOOK_PRICE FLOAT NOT NULL,
   BOOK_AUTHOR VARCHAR(400) NOT NULL,
   PRIMARY KEY (BOOK_ID)
);

Jumping ahead, this is how our final CRUD functions look like:

(defn get-all-books []
 (db-run crud-read "SELECT * FROM books" format-book nil))

(defn add-book [name author price]
  (db-run crud-add [:Books [:BOOK_NAME :BOOK_AUTHOR :BOOK_PRICE]] 
	  format-book [name author price] ))

(defn delete-book [id]
  (db-run crud-delete [:Books ["BOOK_ID=?" id]] format-book nil))

(defn update-book [id name author price]  
  (db-run crud-update [:Books ["BOOK_ID=?" id]] format-book 
	  {:BOOK_NAME name :BOOK_AUTHOR author 
	       :BOOK_PRICE price} ))

(defn format-book [res] 
  (html [:books (map (fn [x] [:book x]) res)]))

Some simple things to help you understand the code above: defn defines a function, square brackets define vectors or maps, a colon prefix indicates a key name for a map.

In seventeen lines of code, the high level CRUD is done. I find this beautiful. The above functions are the only ones that know our schema, the rest are generic.

The following four functions define each CRUD operation generically:

(defn crud-read [sql resfn args]
  (with-query-results rs [sql]
    ;; pass result to resfn
    (resfn rs)))

(defn crud-add [sql resfn args]
   (resfn
    (insert-values
     ;; table name and fields
     (first sql) (last sql)
     ;; values to insert
     args)))

(defn crud-delete [sql resfn args]  
  (resfn
   (delete-rows 
    ;; table name and condition
     (first sql) (last sql))))

(defn crud-update [sql resfn args]
  (resfn
   (update-values 
    ;; table name, condition
    (first sql) (last sql) 
    ;; values to update with
    args)))

These functions are then passed (according to the CRUD operation desired) to our generic function to access the database:

; Don't forget to substitute your database name, 
; username and password in the above code.
(defn db-run
  [crudop sql resfn args]
  (let [db-host "localhost"
        db-port 3306
        db-name "dcd"]
    (def db {:classname "com.mysql.jdbc.Driver"
           :subprotocol "mysql"
           :subname (str "//" db-host ":" db-port "/" db-name)
           :user "root"
           :password "root"})
    (with-connection db
      ;; perform CRUD
      (crudop sql resfn args))))

The above function takes four parameters - the operation to perform with the database connection, the SQL to execute, the function to call on the result and arguments for the SQL.

The flow is as follows: add-book, get-books, etc. call db-run with crud-add, crud-read, etc. along with the schema details and the GET parameters.

The servlet configuration for compojure is:

(defroutes webservice
  (GET "/get" 
    [{:headers {"Content-Type" "text/xml"}}
     (get-all-books)]) 
  (GET "/add" 
    [{:headers {"Content-Type" "text/xml"}}
     (add-book (params :name) (params :author) (params :price) )]) 
  (GET "/delete" 
    [{:headers {"Content-Type" "text/xml"}}
     (delete-book (params :id) )]) 
  (GET "/update" 
    [{:headers {"Content-Type" "text/xml"}}
     (update-book (params :id) (params :name) (params :author) (params :price) )]) 
  ) 

;; run integrated jetty
(run-server {:port 8080} 
  "/*" (servlet webservice))

That's it, our server side is done.

Flash Builder Goodness

Accessing the Clojure methods in Flash Builder 4 to build a Flex application is easy.

1) Get Adobe Flash Builder 4 Beta 2 from Adobe Labs if you haven't already.

2) Create a new Flex Project, type in a project name and hit Finish.

3) In the bottom part of Flash Builder, choose the Data/Services tab and click on "Connect to Data/Service".

New Project Wizard

4) Pick "HTTP", hit Next.

Connect to Data Service Wizard

5) Select "Yes" to pick a common base URL: http://localhost:8080/. Add the four operations: getBooks, addBook, updateBook, deleteBook. The first doesn't take any parameter, second takes in three parameters: name, author and price. updateBook takes in the same parameters along with an "id" parameter. The deleteBook operation only takes in an "id" parameter of type int.

Connect to Data Service Wizard

6) Type in a service name "BookService". Hit Finish.

7) Your Data/Services tab should be populated with the service and methods. Right click the getBooks() method and choose "Configure Return Type."

Connect to Data Service Wizard

8) Hit Next twice and Flash Builder should have automatically connected to your clojure backend and detected your return type. Select the "root" as "book."

Connect to Data Service Wizard

9) Hit Finish. Now right click the addBook() method and choose "Configure return type".

10) Hit Next. Enter a sample name, author and price. Hit Next and then Finish.

Connect to Data Service Wizard

11) Repeat steps 9 - 10 for update and delete while providing the appropriate sample input values.

Wiring it to a Flex UI

This section wires the services you set up earlier to the Flex UI. This is similar to the "Wiring to a Flex UI" section in "Building a CRUD application using Java 6 Web Services and Flash Builder 4."

1) Start off by replacing your main MXML file with the following code:

<?xml version="1.0" encoding="utf-8"?>
<s:Application xmlns:fx="http://ns.adobe.com/mxml/2009" 
	       xmlns:s="library://ns.adobe.com/flex/spark" 
	       xmlns:mx="library://ns.adobe.com/flex/halo" 
               minWidth="1024" minHeight="768">
<s:Panel title="Books" x="61" y="78" width="124" height="387">
  <s:List id="list" x="0" y="10" width="100%" height="100%" 
	  borderVisible="false"></s:List>
</s:Panel>
<s:Panel title="Book Info" x="193" y="78" width="379" height="387">
  <mx:Form x="0" y="10" width="377" height="300">
  </mx:Form>
  <s:HGroup x="66" y="309"  
	    height="46" 
	    verticalAlign="middle"  
	    contentBackgroundColor="#938F8F">
    <s:Button label="Add" id="button"  />
    <s:Button label="Update" id="button2" />
    <s:Button label="Delete" id="button3" />
    <s:Button label="Get" id="button4"  />
  </s:HGroup>
</s:Panel>
</s:Application>

You should now have a UI that looks this in design view:

Flash Builder 4

2) Switch to design view. Select the list in the "Books" panel. Right click the list and choose "Bind to Data".

Flash Builder 4

3) Choose "New service call" and select the operation as getBooks(). Choose "Bind to field" as name.

Flash Builder 4

4) Now select the form in the "Book Info" panel, right click it and choose "Bind to Data." Choose "Data type" in the "Generate form for" drop down. Hit Next.

Connect to Data Service Wizard

You can choose the ordering of values in the wizard.

Connect to Data Service Wizard

The generated form by default is bound to a value object with name "book."

5) Right click the list in the "Books" panel and choose "Generate Change Handler." The view will shift to source code and type in the following code into the change event handler:

/* point book to the selected item */
book = list.selectedItem as Book;

This is done so that every time the selected changes in the list, the form on the right is updated. If you run the application now, it should get the list of books from the server.

6) To make sure the first item in the list is selected every time the list is retrieved from the server, add a "result" event handler to the CallResponder that fetches the data in your main MXML file.

<s:CallResponder id="getBooksResult" result="list.selectedIndex=0"/>

CRUD

Getting the Add/Update/Delete/Get buttons to work is painless:

1) Select the Add button in design view.

2) Right click, choose "Generate Service Call" and choose the addBook operation.

3) The IDE automatically switches to source view so that you can type in the parameter to the addBook operation. Simply type in book.book_name , book.book_author, and book.book_price.

protected function button_clickHandler(event:MouseEvent):void
{
    addBookResult.token = bookService.addBook(book.book_name, 
					      book.book_author, 
					      book.book_price);
}
CRUD App with Clojure and Flash Builder 4

4) Repeat steps 1 - 3 for the update and delete buttons. The delete button uses an integer parameter, book.bookid instead and updateBook needs that along with the rest.

5) Right click the "Get" button and choose "Generate Click Handler." In the event handler, call the list's creation complete method.

protected function button4_clickHandler(event:MouseEvent):void
{
    list_creationCompleteHandler(null);
}

6) Optionally you could call list_creationCompleteHandler(null) after add, update and delete so that the list on the left is refreshed.

That's it, you have a CRUD app working! You can download the complete MXML file here.

CRUD App with Clojure and Flash Builder 4

Conclusion

Clojure is a powerful, modern Lisp dialect that is designed to be parallel and has a symbiotic relationship with the JVM. Coupled with compojure, web application development becomes easy via the embedded Jetty server. Hooking up the clojure backend to a Flex UI is a matter of mere minutes.

Together, clojure and Flash Builder 4 can help you easily build succinct, functional and parallel web applications.

For more Flash Builder 4 articles, visit Sujit's blog.

CategoryFlex Comment(s)


Building a CRUD application using Java 6 Web Services and Flash Builder 4

October 12, 2009 5:29 PM

Java SE 6 has built-in support for web services thanks to JAX-WS 2.0. Armed with nothing more than JDK 6, you can easily publish or consume a web service. This makes it really easy for a developer to prototype and quickly get started with web services. Using the data-centric features in Flash Builder 4, a web service can be easily introspected and accessed. In this article, I will build an end-to-end simple CRUD application in Java and Flex 4, where the Java methods are exposed as web service operations.

Java 6 Goodness

On the java side, all you need for this article is JDK 6 and optionally the mysql connector JAR if you want to run the final application.

To look at the complete Java code, download BookService.java and Book.java. The sample uses a simple mysql table called Books:

CREATE TABLE Books
(
   BOOK_ID SMALLINT UNSIGNED NOT NULL AUTO_INCREMENT,
   BOOK_NAME VARCHAR(400) NOT NULL,
   BOOK_PRICE FLOAT NOT NULL,
   BOOK_AUTHOR VARCHAR(400) NOT NULL,
   PRIMARY KEY (BOOK_ID)
);

INSERT INTO Books ( BOOK_NAME, BOOK_PRICE, BOOK_AUTHOR ) 
       VALUES ( 'Midnight''s Children', 250, 'Salman Rushdie')
INSERT INTO Books ( BOOK_NAME, BOOK_PRICE, BOOK_AUTHOR ) 
       VALUES ( 'Shame', 225, 'Salman Rushdie');
INSERT INTO Books ( BOOK_NAME, BOOK_PRICE, BOOK_AUTHOR ) 
       VALUES ( 'To Kill a Mocking Bird', 250, 'Harper Lee');
INSERT INTO Books ( BOOK_NAME, BOOK_PRICE, BOOK_AUTHOR ) 
       VALUES ( 'The Colour of Magic', 250, 'Terry Pratchett');

To expose your Java class as a web service, simply:

1) Annotate your Java class with @WebService, @WebMethod.

package com.sample;

import com.sample.Book;
import javax.jws.WebService;
import javax.jws.WebMethod;
import javax.jws.soap.SOAPBinding;
import javax.xml.ws.Endpoint;

@WebService
@SOAPBinding(style = SOAPBinding.Style.RPC)
public class BookService 
{

    @WebMethod
    public int addBook(Book book) 
    {
        /* insert book into db */
        int resultCode = 0;
        Connection connection = null;
/* code omitted for brevity */

2) Use the Endpoint class in main()

   public static void main(String[] args)
    {
        // create and publish an endpoint
        BookService bookservice = new BookService();
        Endpoint endpoint = Endpoint.publish("http://localhost:8080/books", bookservice);
    }

3) Create a directory called generated and run apt (Annotation Processing Tool):

apt -cp .;mysql.jar -d generated com\sample\BookService.java

4) Run your class:

java -cp generated;mysql.jar com.sample.BookService

That's it, you have a web server running on localhost:8080 and you can access the WSDL by navigating to http://localhost:8080/books?wsdl

Flash Builder 4 Magic

Accessing the WSDL in Flash Builder 4 to build a Flex application is a snap.

1) Get Adobe Flash Builder 4 Beta 2 from Adobe Labs if you haven't already.

2) Create a new Flex Project, type in a project name and hit Finish.

3) In the bottom part of Flash Builder, choose the Data/Services tab and click on "Connect to Data/Service".

New Project Wizard

4) Pick Web Service, hit Next.

Connect to Data Service Wizard

5) Paste the WSDL URL http://localhost:8080/books?wsdl as the "WSDL URI" and hit Finish.

Connect to Data Service Wizard

6) Flash Builder 4 will introspect the WSDL and show you a list of operations you can select. Hit Finish.

Wiring it to a Flex UI

1) Start off by replacing your main MXML file with the following code:

<?xml version="1.0" encoding="utf-8"?>
<s:Application xmlns:fx="http://ns.adobe.com/mxml/2009" 
	       xmlns:s="library://ns.adobe.com/flex/spark" 
	       xmlns:mx="library://ns.adobe.com/flex/halo" 
               minWidth="1024" minHeight="768">
<s:Panel title="Books" x="61" y="78" width="124" height="387">
  <s:List id="list" x="0" y="10" width="100%" height="100%" 
	  borderVisible="false"></s:List>
</s:Panel>
<s:Panel title="Book Info" x="193" y="78" width="379" height="387">
  <mx:Form x="0" y="10" width="377" height="300">
  </mx:Form>
  <s:HGroup x="66" y="309"  
	    height="46" 
	    verticalAlign="middle"  
	    contentBackgroundColor="#938F8F">
    <s:Button label="Add" id="button"  />
    <s:Button label="Update" id="button2" />
    <s:Button label="Delete" id="button3" />
    <s:Button label="Get" id="button4"  />
  </s:HGroup>
</s:Panel>
</s:Application>

You should now have a UI that looks this in design view:

Flash Builder 4

2) Switch to design view. Select the list in the "Books" panel. Right click the list and choose "Bind to Data".

Flash Builder 4

3) Choose "New service call" and select the operation as getBooks(). Choose "Bind to field" as name.

Flash Builder 4

4) Now select the form in the "Book Info" panel, right click it and choose "Bind to Data." Choose "Data type" in the "Generate form for" drop down. Hit Next.

Connect to Data Service Wizard

You can choose the ordering of values in the wizard.

Connect to Data Service Wizard

The generated form by default is bound to a value object with name "book."

5) Right click the list in the "Books" panel and choose "Generate Change Handler." The view will shift to source code and type in the following code into the change event handler:

/* point book to the selected item */
book = list.selectedItem as Book;

This is done so that every time the selected changes in the list, the form on the right is updated. If you run the application now, it should get the list of books from the server.

6) To make sure the first item in the list is selected every time the list is retrieved from the server, add a "result" event handler to the CallResponder that fetches the data in your main MXML file.

<s:CallResponder id="getBooksResult" result="list.selectedIndex=0"/>

CRUD

Getting the Add/Update/Delete/Get buttons to work is painless:

1) Select the Add button in design view.

2) Right click, choose "Generate Service Call" and choose the addBook operation.

3) The IDE automatically switches to source view so that you can type in the parameter to the addBook operation. Simply type in book

protected function button_clickHandler(event:MouseEvent):void
{
    addBookResult.token = books.addBook(book);
}
CRUD App with Java 6 Web Services and Flash Builder 4

4) Repeat steps 1 - 3 for the update and delete buttons. The delete button uses an integer parameter, book.bookid instead of book.

5) Right click the "Get" button and choose "Generate Click Handler." In the event handler, call the list's creation complete method.

protected function button4_clickHandler(event:MouseEvent):void
{
    list_creationCompleteHandler(null);
}

6) Optionally you could call list_creationCompleteHandler(null) after add, update and delete so that the list on the left is refreshed.

That's it, you have a CRUD app working! You can download the complete MXML file here.

CRUD App with Java 6 Web Services and Flash Builder 4

Conclusion

Web services are an easy medium to tap into for both Java and Flex developers. JDK 6 and Flash Builder comes with out-of-the-box support for it and you can quickly have an end-to-end application ready in no time.

For more Flash Builder 4 articles, visit Sujit's blog.

CategoryFlex Comment(s)


Accessing a Coldfusion Data Source from Flash Builder 4 without writing Code

October 7, 2009 12:45 PM
In the second beta of Adobe Flash Builder 4, there is this gem of a feature that helps developers get started without writing a single line of code. Flash Builder 4 can take a ColdFusion data source as input and output server & client side code to read/modify the database. Simply point to your ColdFusion server, choose a data source and Flash Builder 4 will : Introspect it, generate server side code (CFC) to access the selected table, and also, create a Service in Flash Builder whose CRUD methods you can drag and drop on to Flex components.

The Table and You

You know how it goes. There's you, the developer. And there's this database table you need to access. You add it to ColdFusion as a data source. The possibility of cfquery and SQL is in the air. If you have worked with ColdFusion, you are probably wondering how many times you have done this before and which existing CFC of yours to copy-paste the cfquery bit from. If you are new, sample CFCs and Google beckon you mockingly.

Now imagine how much faster you would be, if you were able to simply choose the data source and Flash Builder 4 will perform almost all of the heavy lifting for you.

The Easy Path

Let us do this step by step. Add a data source to ColdFusion (I'm using the members table in the cfbookclub data source) and:

0) Make sure RDS is enabled in ColdFusion. You can confirm this by checking web.xml in ColdFusionCentaur/wwwroot/WEB-INF folder. There will be two sections which you have to uncomment:

<!-- begin RDS -->
<servlet-mapping id="coldfusion_mapping_9">
  <servlet-name>RDSServlet</servlet-name>
  <url-pattern>/CFIDE/main/ide.cfm</url-pattern>
</servlet-mapping>
<!-- end RDS -->

<!-- and (several lines omitted for brevity) -->

<!-- begin RDS -->
<servlet id="coldfusion_servlet_8789">
  <servlet-name>RDSServlet</servlet-name>
  <display-name>RDS Servlet</display-name>
  <servlet-class>coldfusion.bootstrap.BootstrapServlet</servlet-class>
  <init-param id="InitParam_103401311065856789">
  <param-name>servlet.class</param-name>
  <param-value>coldfusion.rds.RdsFrontEndServlet</param-value>
  </init-param>
</servlet>
<!-- end RDS -->

More information regarding enabling and disabling RDS is available in this technote. Be aware of the security implications of enabling RDS.

1) Get Adobe Flash Builder 4 Beta 2 from Adobe Labs if you haven't already.

2) Create a new Flex Project, choose ColdFusion as the Application Server Type.

New Project Wizard

3) Click Next, choose the correct path to your ColdFusion root folder, Web root and Root URL (the default Root URL is http://localhost:8500). Click on Validate configuration to make sure the data you entered is correct.

New Project Wizard

4) In the bottom part of Flash Builder, choose the Data/Services tab and click on "Connect to Data/Service".

New Project Wizard

5) Pick ColdFusion, hit Next.

Connect to Data Service Wizard

6) Now, click on "click here to generate a sample" to start the magic.

Connect to Data Service Wizard

7) Choose "Generate from RDS datasource and enter your RDS username and password, hit OK.

Connect to Data Service Wizard

8) All your data sources should be listed now. Pick a data source and a table (I chose cfbookclub as the data source and members as the table), hit OK.

Connect to Data Service Wizard

9) Now your Data/Services tab should be populated with CRUD methods to read and update the table and the generated CFC will open with the default associated editor.

Connect to Data Service Wizard

10) Switch to design view, drag and drop a DataGrid on to your application.

11) Now drag and drop an operation from the Data/Services tab such as getAllMembers() onto the DataGrid. The column names of the DataGrid should now have the same names as the field names of your table.

Connect to Data Service Wizard

12) Run the application and the data from the table should be populated in the DataGrid.

Connect to Data Service Wizard

Important Points to Note

  • The generated CFC is an easy starting point and prototype for developers. Be fully aware of the functionality it exposes to end users.
  • The generated service CFC will have seven methods. These operations along with Flash Builder 4 goodness enables automatic support for Data Paging and Data Management.
  • Do not expose the generated CFC to end users without authentication unless you are sure about it.
  • Important security information is included in the comments of the generated CFC. Read it carefully.
  • Blob fields may have issues with this feature.

Generated Code

This is how the getAllMEMBERS function in the generated CFC looks like:

<cffunction name="getAllMEMBERS" output="false" access="remote" returntype="any" >
  <cfset var qAllItems="">
  <cfquery name="qAllItems" datasource="cfbookclub">
    SELECT * FROM MEMBERS
  </cfquery>
  <cfreturn qAllItems>
</cffunction>

In the background, Flash Builder 4 will take care of returning objects from ColdFusion and converting that to a strongly typed AS3 object.

On the Flash Builder side, thanks to the Data-Centric development features, the service and data model are represented via the "Data/Services" tab which takes care of AS3 value object generation, service invocation and binding of result to Flex components.

More

If you want the same functionality with a PHP backend, this article will be helpful.

For more Adobe Flash Builder 4 goodness, check out the list of articles on Sujit's blog.

CategoryFlex Comment(s)


Beautiful Reading via Flex 4

September 1, 2009 10:36 PM
I spend a lot of time reading articles on the web. Somehow, I miss the lack of typesetting and pagination especially when the article is captivating as well as long. This is my attempt at making reading content on the web (and the computer to a certain extent) more beautiful. With a lot of help from Flex 4, Readefine beautifies text, RSS and HTML content for easier reading. Text is laid out in multiple columns, sanitized of stray newlines and paragraphs and a nice font is applied.

What is it?

Readefine is a Flex 4 web application (a desktop one is coming soon) that beautifies RSS, text and HTML content by laying text in multiple columns for easier reading. Take a look at the screenshot below:

readefined

readefined

It can load content from the web, a file on your computer or via copy-and-paste. Readefine supports content in RSS, HTML or plain text format.

Text settings like justification, ligatures, column width / count, etc. can be fully customized and saved.

Some nice things about it:

  • Removes stray newlines, empty p, br tags.
  • Newspaper like layout for RSS - my aim was for RSS files to look like a newspaper1.
  • Paginates rather than supporting scrolling. I hate scrolling while reading a lot of text.
  • Makes long plain text files beautiful and also sections them for performance.
  • Copy paste or load a file from your computer (load, not upload)
  • Gives a new look to those valuable Gutenberg text files
  • Remembers the last 30 URLs you have visited.
  • Re-flows text according to the available size.
  • Resizes images to fit within the columns.
  • Tries to compute the absolute URL from a relative link.

Some not so nice things:

  • HTML support is experimental. Certain HTML (even from popular sites like the Wall Street Journal) will make it go crazy. Plain text and RSS work best.

For the Flex Community

This is my first full-fledged Flex 4 application. Flex 4 rocks!

The components used in this extend the existing Flex 4 and Text Layout Framework classes to add pagination, HTML cleanup and tolerant HTML import. I've also built a Scroller like component for the overflow of articles from top DataGroup to the one on the left side. I will be open sourcing these components shortly for the benefit of the developers out there.

Try it out and let me know. Any feedback is welcome.

CategoryFlex Comment(s)


[1] Though I don't know how far I have achieved that goal.


Flex 4 Component - Slanted Button Bar

August 10, 2009 7:10 PM
Ah, the joys of working with Flex 4. I built this small component in Flex 4 that has slanted or hatched buttons. Each button is a parallelogram and two sides along with the label are at an angle of 35 degrees. They look pretty good when coupled with a viewstack right under it.

Once I built the Button extending from ButtonBarButton, it did not work according to what I had in mind with the default ButtonBar layout (horizontal). There was space left between the components (rightly so) which I did not want empty. I edited the skin to set a gap to -41 and it looked ok. But hard coding -41 is not nice. So I wrote a custom layout (HatchedLayout) that computes the correct distance (only if layoutElement is a HatchedButton). The whole thing took me a Friday afternoon.

This is how a HatchedButtonBar looks like:

HatchedButtonBar

This is how the HatchedButtonBar looks like coupled with a ViewStack: View Demo

HatchedButtonBar with a ViewStack

There's a demo app that shows the component by itself, with the normal layout and with the modified layout: View Demo

HatchedButtonBar Tutorial

Let me know if you guys like it. As always, this is open source (under the MPL 1.1) and the source is available here for download.

CategoryFlex Comment(s)


Copyright © 2004-2008 Anirudh Sasikumar. All rights reserved.
Last Updated: December 19, 2007 7:04 PM